
Lesson 2: Ground Exercises
The big maiden flight takes place today, but if you're not careful, today can also be the first repair day. Just a quick heads-up :)
This lesson's goal is to become proficient in basic 1 (or 2)-channel control: forward-backward, and side-side if your heli permits it.
Now that you have your heli in prime condition and your battery(s) charged, its time to start flying! Place your heli in the middle of a large, smooth area, such as a garage or driveway. Depending on your heli's size, the area could be bigger or smaller, but as a general rule I would go with at least a foot for every inch of your rotor diameter while you are learning. So, for example, with a 24" rotor diameter I would recommend at least 24 square feet (preferably 12 x 12) of free space (no furniture), to allow you to be comfortable flying. Yes, it is possible to learn in a smaller area, but why make learning harder? I recommend that you fly indoors (preferably in a garage) unless the wind is under 1mph (basically, learn inside), as wind makes it more difficult to control the heli and can possibly tip it if you don't have the skills yet to correct for this.
Range Checking
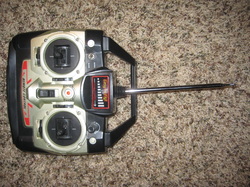
Adjusting the Radio Transmitter
If your heli does pass its range check, extend the mast fully or return to the main screen. Now you are ready to fly!
Your heli should already be in the middle of your area facing tail in with you in position 1, away from any obstacles. Now very slowly power up the main rotors until the heli is almost leaving the ground. If it does leave the ground power down a little until it is barely not taking off.
On most coaxial controllers (mainly the ones included with beginner helis) there will be a round knob at the top right side labelled "trim." This knob technically varies the speed of each rotor, but for functional purposes it is how you "neutral" the heli's rotation. If you notice that your coaxial helicopter turns without any command to do so, then adjust this knob until the heli stays pointing in one direction. Depending on your heli, you may have to adjust this slightly with any change in throttle. This happens because one motor is stronger than the other.
Some FP helis may have a trim knob; use it if its included :)
Centering the Remote:
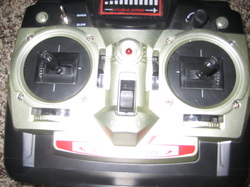
Another thing you want to check is controller centering. On the side of most radio knob areas there are little sliders. This is the tricky part, because some work by relocating neutral, and some work by correcting a drift. For the 9053, the sliders relocate neutral. If you move the slider to one side, "neutral" will also move to that side.
What you want to do is center each channel. For vertical tail rotor coaxials, begin by decreasing the throttle about 25%, then slowly push the forward stick until the tail propeller begins to spin. Mark where this is in relation to the side lines, if your radio has them, or mentally. Release the control, then slowly push the stick back until the tail propeller spins again. Mark this as well. Then compare the two: if they are not the same distance from the center, then adjust the vertical slider until they are. To move the center forward, move the slider up; move the slider down to move the center backwards.
For radios that correct drifts, push the slider in the opposite direction to the drift. For example, if the heli moves to the left, push the left and ride slider to the right.
Now center turning. You want the speed at which your heli turns (yaws) to be equal for equal control input on either side of neutral. In other words, a full turn in one direction should be at the same speed as a full turn in the other direction.
Now throttle back up until your heli is barely not leaving the ground.
Beginning Controlled Flight:
Initiating Forward Flight.
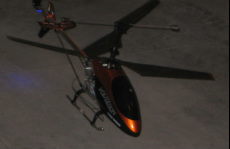
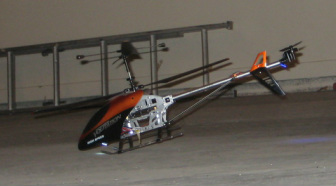
Now, push forward very gently on the forward stick, the right one. On three channel coaxials with a vertical tail rotor, the tail propeller should begin to spin and the heli will tilt forward, as the picture shows. Helis with a swashplate will tilt the swashplate to initiate forward flight.
Go forward about 5-10 feet, or less if this would cause you to hit a wall or other obstacle. You may notice a slight turning affect (which is explained in my section on tail rotor rules and is perfectly normal for three channel coaxials), just correct for it with a slight turn in the opposite direction. Once again, just small control inputs are needed. Stop, then go backwards 5-10 feet (again using a little bit of turning if needed). If the heli won't go backwards even on full back command (because the tail fin is hitting the ground and not sliding) then increase the throttle just slightly until the tail fin slides backwards on a back command.
Repeat this exercise until you feel fully comfortable with forward and backwards flight, remembering to always keep the tail closest to you and the nose pointed away from you - as if you were in the heli.
Side Movements:
Ground Exercises.
If you own a helicopter with 4 or more channels, now go sideways 5-10 feet, first to the left and then to the right. Do this a few times to be secure with it. Be careful not to tip the heli over, as when moving sideways there is less skid to keep the heli upright. If you find that the helicopter blades are about to hit the ground, cut the throttle and start again. The goal is to get used to the sensitivity of the controls. Take your time with this and keep the heli pointed away from you; remember that real helicopter pilots spend nearly 100 hours and pay about $10k to get certified to fly. A few minutes is nothing really :)
If you have a 3 channel heli, practice a few turns staying put. You will need to use plenty of turning to control your heli. For 4-channel pilots, avoid turning to avoid losing control and crashing!
If you have a 3 channel heli, practice a few turns staying put. You will need to use plenty of turning to control your heli. For 4-channel pilots, avoid turning to avoid losing control and crashing!
On to Lesson 3:
Moving on . . .
Well you've successfully completed Lesson 2. Well Done! Next lesson will be even more challenging, though, so take a break before flying some more.
