
Lesson 5: Cyclic Figure 8s
Today's lesson is probably one of the easiest of Flight School. You will be utilizing the skills you learned in lesson 4 to make circles and figure 8s. Beginning from this lesson onwards, the lesson content will get more and more fun. Now you get to start learning how to put your helicopter in motion, which looks much cooler than staying in one spot.
You'll want to still fly with the same beginner-friendly DR and throttle and pitch curves from lesson 2, as well as in the same type of location: on cement or tile or asphalt.
For this lesson you will need at least 12 horizontal feet and 6 vertical feet from all directions of your helipad (see the diagrams below). If this is a problem (such as if you are inside), you can decrease the circles below to about 6ft (1.8m) in diameter, but no less. Otherwise, you really aren't learning anything new. If this is still too big, then you can do the individual circles (under Your First Circle) inside with only 6 square feet of free space, but otherwise or for Figure 8s you will need to venture outside, at least for today. Lessons 6 and 7 can be done inside again if you have a micro heli.
If this lesson is your first attempt at outdoor flight, then remember wind limits while learning for your size heli; larger helis will be easier outside. If you have a micro or small heli, you will probably want to practice hovering 5-20 minutes, taking care to make full use of throttle / collective (keep flying in general scale type throttle / pitch curves mode from lesson 2)
You'll likely end up hitting the ground a few times, so grass is still not a good idea because it can snag on your training gear and / or vertical stabilizer and possible send the rotors into the ground.
Approximate Lesson Length: About 2 1/2 hours of Flight Time
Your First Circle
To begin, start out over your helipad in a tail-in orientation with you standing in position 1, just like in all the previous lessons. If you haven't flown in a while, refresh yourself with a few Diagonal Lesson 4 Hovering Exercises. When you're ready, hover tail-in at about 2 feet (60cm) over your helipad.
Now, begin to slowly move forwards and to the right. As you move, you will want to start changing the direction you travel to solely to the left to make an arc with radius 5 ft (1.5m). As soon as you have gone 5 feet forwards and to the right, begin to arc backwards and to the right. After you have gone another 5 feet to the right and 5 feet backwards, you will have made a half circle (diagrams coming soon 9-20-12) with diameter 10 feet. Without stopping, start to arc backwards and to the left 5 feet, then forwards and to the left 5 feet to end up back over your helipad. Keep your speed nice and slow, with this circle (a right cyclic circle) taking about 12-15 seconds.
Now, begin to slowly move forwards and to the right. As you move, you will want to start changing the direction you travel to solely to the left to make an arc with radius 5 ft (1.5m). As soon as you have gone 5 feet forwards and to the right, begin to arc backwards and to the right. After you have gone another 5 feet to the right and 5 feet backwards, you will have made a half circle (diagrams coming soon 9-20-12) with diameter 10 feet. Without stopping, start to arc backwards and to the left 5 feet, then forwards and to the left 5 feet to end up back over your helipad. Keep your speed nice and slow, with this circle (a right cyclic circle) taking about 12-15 seconds.
|
How did you do? The average flier will have just made a nice diamond type shape, which looks pretty good but isn't quite what we want. That's okay, let's move onto a left cyclic circle. Arc forward to the left 5ft, then backwards to the left 5ft to make a 10ft diameter semicircle, then arc backwards to the right 5ft, then finish the circle by arcing 5ft forwards and to the right 5ft to end up hovering over your helipad.
Once again, take about 12-15 seconds to make this slow left circle. Remember, don't be too disheartened if your "circle" is a highly deformed ellipse, the purpose of flight school after all is to learn to fly. Think how boring this would be if you got it perfect the first time. |
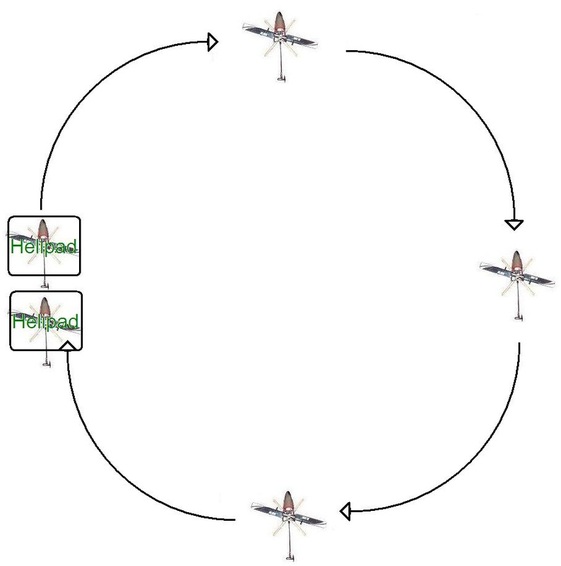
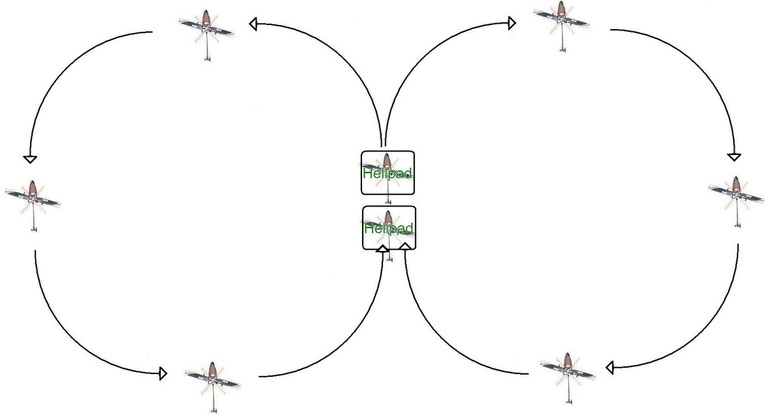
Right Cyclic Circle
|
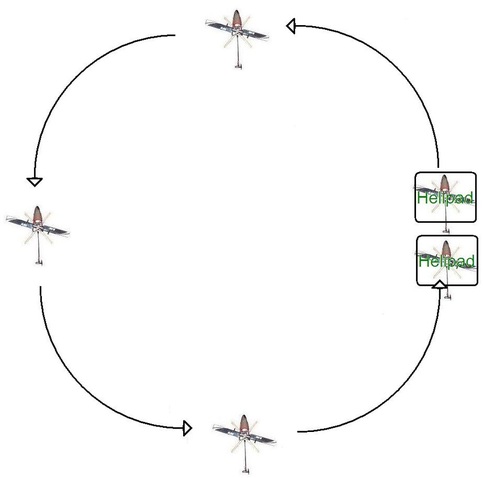
Left Cyclic Circle
|
You will probably notice that you end up counter-correcting in these circles more than commanding. In other words, when you are arcing forwards and to the left you will probably be using your backwards and to the right cyclic. This is more pronounced on flybarless helis. This is fine (actually probably best), it will allow you to continually dampen the heli's tendency to accelerate faster and faster in your circles, which is something you want to avoid today at all costs.
Now lets go back to a right cyclic circle. Practice doing a 10ft diameter circle 5 times, stopping in between each one and hovering for 15 seconds over the helipad. Try and keep the helicopter always moving at a constant speed. Now practice a left cyclic circle of the same diameter 5 times, once again taking 12-15 seconds to complete it. |
Cyclic Figure 8
Forward Cyclic Figure 8
Now that you feel semi-comfortable with left and right circles, let's put them together to make a Cyclic Figure 8 (the goal of this lesson). Make a right cyclic circle of 10 ft diameter, then as soon as you get over the helipad do not stop, continuing moving forward and to the left to connect a left cyclic circle onto your right cyclic circle. As soon as you have made it back over to the helipad 25-30 seconds later you have done it! You just did a Forward Cyclic Figure 8.
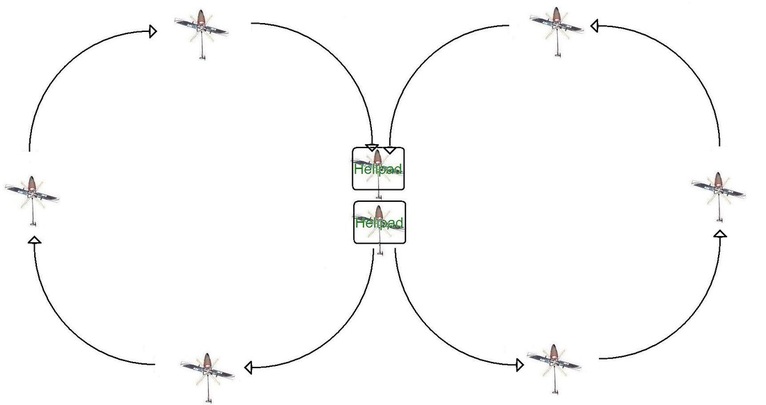
Backwards Cyclic Figure 8
What's next: yup, you guessed it, lets do a Backwards Cyclic Figure 8 now. Start by going Backwards and to the right, then arc the 10ft circle around back to your helipad and pass over it backwards and to the left to complete a backwards left cyclic circle (a mouth full).
As soon as you are comfortable with these figure 8s (keeping them to at least 25-30 seconds), nope, its not time for a Left Backwards Cyclic Figure 8. I decided that name is too long. So instead just link several figure 8s in succession, keeping the speed constant and taking about 25-30 seconds to complete each figure 8. Also make sure that you always are in control of your heli.
Well another lesson down . . . you're almost half done with Flight School! Lesson 6 isn't the funnest, but it's not too long and is absolutely necessary to survive Lesson 7, where you're point of view relative to the helicopter begins to change. On to lesson 6!
Well another lesson down . . . you're almost half done with Flight School! Lesson 6 isn't the funnest, but it's not too long and is absolutely necessary to survive Lesson 7, where you're point of view relative to the helicopter begins to change. On to lesson 6!
