
Lesson 8: Slow Circle Circuits
This lesson is all about performing your first circuit. Of note is the fact that if you have been flying inside a house, now is the time to move to a gym or outside; a large garage may still work for this lesson. This lesson prepares you for Fast Forward Flight and Larger Circuits, so you'll want to be very secure with the circuits in this lesson before you move on.
Lesson Length: about 2-3 hours of Flight Time
I should note that I took less than 2 hours to learn to fly this lesson; for me, it seemed easy. Others, however, have a more difficult time; just practice this lesson until you are ready for Fast Forward Flight.
The best surface for today's lesson is still probably concrete or asphalt; as you get more comfortable and morf into Lesson 9 you will probably want to move to a grass field, because it will cushion crash impacts. However, grass will also catch easier on your skids and especially training gear. The best advice is to stay over concrete for now.
D/R and EXPO from the end of lesson 7 (60% D/R and 28% EXPO) and Throttle and Pitch Curves from lesson 2 will be great for today.
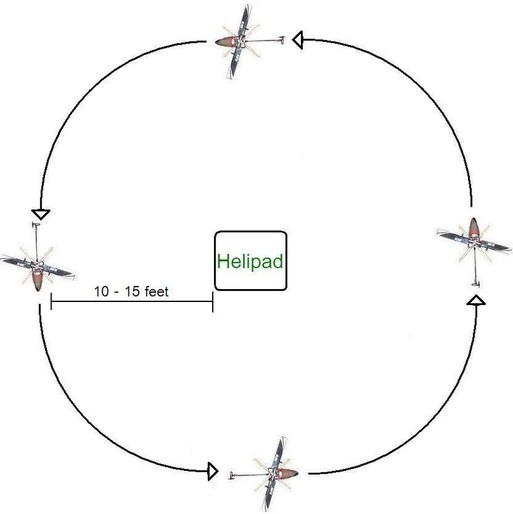
Slow Centered Counter-Clockwise Circle Circuit
|
Whew! A mouthful. I'll break it up into parts: This is a relatively slow circuit (a maneuver in which the nose of the helicopter always points in the direction of flight). It is basically a circle that is flown around the pilot (centered) so that the same side of the helicopter always faces you (contrast this with a Projected Circuit in Lesson 11). And it is flown with the helicopter moving counter-clockwise, because it is easier.
As the diagram shows, you will stand over your helipad, with the helicopter 10-15 feet in front of you. In a centered Circuit, you (the pilot) are the center of the circuit, in this case a circle. Therefore, the heli should always stay the same distance (10-15 feet) away from you. |
|
You will want to start out with the helicopter hovering at about 3-4 feet in the air. At this height, you will need to continually adjust your throttle / pitch to stay at that altitude. Then, slowly nudge the cyclic forwards. As the heli begins to move to the left, hold in a slight bit of left rudder to make the helicopter turn continuously as it moves. You will need to hold in constant rudder (tail rotor) to keep the heli turning the entire time. You will also probably discover that you occasionally pull back on your cyclic stick a bit to keep the helicopter at about 3-4 feet in the air and not moving too fast. Hardly worth mentioning by now, but just like any flying you will need to constantly correct for left / right movement and forwards back movement (in this case you will correct for increases or decreases in forward movement).
If you find that your heli begins to gain altitude and ascends to near 10 feet in the air, you are going too fast. If this happens, simply stop and slowly land. With the gentle throttle and pitch curves that you are still using from lesson 2, you should be able to land in one piece, even if you freak out at seeing the helicopter so high (don't worry, everyone gets scared the first time (or two) their heli gets a few feet above their head), as long as you keep the helicopter level. Then get back up to about 3-4 feet and start again.
Practice this circuit a few times, making sure to move at a relatively slow CONSTANT speed. It should take you about 15-20 seconds to complete this circle.
Now that you have learned to fly a Counter-Clockwise circuit, you guessed it, time for another mouthful . . .
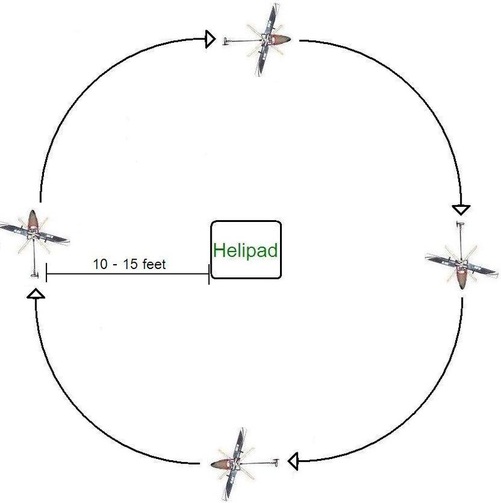
Slow Centered Clockwise Circle Circuit
|
Like the above, this is a slow circuit around you in the clockwise direction. However, you will probably find it is a little more difficult than the counter-clockwise circuit above. This is because the tail rotor has to work harder to turn the helicopter against the torque of the main blades. When flying counter-clockwise, the rotor decreases it's speed / pitch and thus allows the torque of the main rotor to do part of the work. Thus, when flying clockwise, you will always need to use more tail rotor.
Like the counter-clockwise circuit above, slightly nudge the cyclic forwards and hold in right rudder, but a bit more than above so that the helicopter flies in a circle around you, always pointing in the direction of flight. |
You will probably find yourself pulling back on the cyclic occasionally to keep the helicopter moving slow enough and at about 3-4 feet. You want to take about 15-20 seconds to complete one circuit. If you find that your heli begins to gain altitude, you are going too fast - in effect, you're entering Fast Forward Flight. If this happens, simply slow down and start again.
Practice your clockwise circuit a few times, making sure once again to move at a relatively slow CONSTANT speed.
Practice your clockwise circuit a few times, making sure once again to move at a relatively slow CONSTANT speed.
Becoming Proficient
Keep flying these circuits, switching which direction you fly ever few circuits or so. Practice making each circle as perfect as possible: as smooth and constant as you can. I intentionally told you to practice first flying left side-in in Lessons 6 and 7 so that left side-in would probably be a little easier than right-side in when you get to this lesson. If this is the case, and it isn't for everyone, the easier nature of counter-clockwise circuits will probably leave you feeling equally comfortable with each side orientation when you move on to Lesson 9. As you practice, make sure that each direction becomes as easy and comfortable for you as the other. If you think that counter-clockwise circuits are easier, practice clockwise ones; if you think clockwise circuits are easier then practice counter-clockwise ones.
At any rate, keep practicing until you can do very good slow circle circuits. For most people, as I said at the beginning, this takes about 3 hours of flight time. When you are 100% comfortable with this lesson, move on to Lesson 9: Fast Forward Flight!
At any rate, keep practicing until you can do very good slow circle circuits. For most people, as I said at the beginning, this takes about 3 hours of flight time. When you are 100% comfortable with this lesson, move on to Lesson 9: Fast Forward Flight!
