
mCP X Mods and Upgrades:

This page is all about upgrades and mods to the Blade mCP X /2 Collective Pitch Helicopter.
Battery Upgrade:

There are a number of batteries out there that make a suitable match with the mCP X, but the best that I've found is the Turnigy Nanotech 300mAh batteries from HobbyKing. They are inexpensive and (so far as I can tell) much better than the already good stock batteries. I've found that I can expect about 30-60 seconds more flight time with them over the stock batteries.
Circuit Board Upgrade:
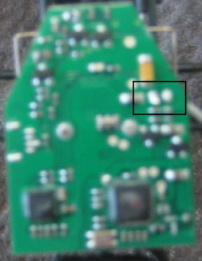
The box marks the solder point
One of the biggest and potentially most expensive problems with the stock mCP X is the likelihood of the battery adaptor wires to come unsoldered from the control board. To help prevent this from happening, I recommend that you immediately glue, with non-conductive glue of course, the two wires to the back of the circuit board with a huge gob of glue. I also recommend taping and glueing part of the wires to the landing skids to further reduce the chances of pulling the wires out of the control board.
If you do accidentally pull the wire(s) out (as I did with one), then don't loose hope; there is still a way to save the control board. All you have to do is resolder the wire to the front of the control board, where the back end of the wire is still soldered. Be careful when doing this to not burn the control board. I would recommend creating a "case" for the wire around the solder connection and then glueing the wire, in contact with the solder point. I found that the wire wasn't soldering well, so that is why I did this. To make it work, all you need to do is hold the wire in contact with the solder point and put solder from the point a little ways up the wire.
Whatever you do, though, remember that the connection between the battery wires and the control board is very fragile on this helicopter.
Parallel Charging with the Celectra Charger
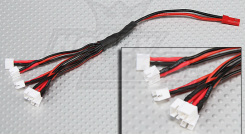
This is the parallel charger I bought.
If you want to save a little charging time, as well as making charging easier, then I recommend this fairly simple upgrade to the mCP X battery charger. All you need is a parallel charging harness that has the correct plug ends on it to connect with the batteries you have (I got mine for under $2 from Hobby King; click here to see what I bought).
Then, cut off the charger plug (in my case, the jst plug) and cut off the battery end of the "Ultra micro battery adapter lead" (the larger plug). Then, solder the black wire to the black wire and the white wire to the red wire. I then wrapped the soldered part tightly in lots of electrical tape and glued the tape ends around the wires.
To use your new parallel charging harness, simply plug the ultra micro end into the stock charger and then plug in 1 to 6 batteries to the parallel charging end. To determine the amp rate, simply add up the individual amp charge rates for each battery; for two or more batteries, you'll probably just want to charge at 0.7 amps, the max charge rate for the Celectra charger. See my Charging / Battery Tips page for more help with finding out the best charge rate for your batteries. Now you can charge up to six of your batteries at once (assuming they all have the same mAh capacity within about 10%), which believe me is very nice, for very cheap.
Of note is that if you do this modification, or if you get a new "ultra micro battery adapter lead," then you can lengthen your mCP X battery wire so batteries are much easier to plug and unplug. (Coming soon!)
Important: Radio Travel Setup
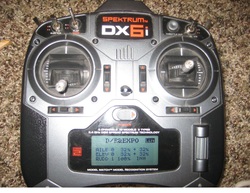
If you fly your mCP X with a DX6i radio (and perhaps many others), there is a significant programming "glitch" that you may not be aware of. When setting travel adjustments, the Radio defaults to only one direction. In the case of pitch, it is down. To set both ends of the travel limit, you need to move the stick in the direction opposite the arrow next to that channel's number. Then you can change the other end of the travel adjustment.
Specifically, if you only set pitch travel adjustment to 75% (the recommended amount to reduce tail blow out) on the bottom, the top half of the pitch curve will reach all the way to 100%. You need to move the throttle stick above mid stick (with the helicopter off, of course) to set the top end of pitch travel. Doing this will reduce or eliminate most instances of tail blow out.
This also applies to elevator, aileron, and rudder. It is likely if you have adjusted the travel for any of these channels that the two ends are different. For example, if you set travel on aileron and elevator to 75% (which I recommend when learning to fly) it is quite likely the travel for the direction that is not default is 100% or anything else. This will make the helicopter more responsive in one direction and it will actually take a few minutes to get used to equal travel if you find out this error later on and fix it (yup, that was me).
Rudder I would leave at the default of 70% to the right and 100% to the left. This will be kinder to the tail motor and hopefully reduce tail blow out even more.
