
Lesson 1: Pre-Flight Inspection
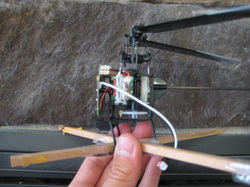
My mCP X wood training gear.
Today is the easiest - but also the most critical - lesson when learning to fly. Much of this lesson may be covered in your helicopter instruction manual, but a large chunk isn't. It shouldn't take too long, so complete it FIRST before moving on to any other lesson.
Alright, after opening the box (or finishing the helicopter assembly), the first thing that you'll want to do is charge the batteries. Prior to doing so, however, browse over my Charging / Battery Tips page for a few minutes. Implementing these ideas will save you flight time and BIG $$$ . . . they don't cost anything, so consider them basic maintenance.
You may also want to visit my Terms and Definitions Page. This is a database of rc and helicopter terms that you may not know. If you don't that's perfectly fine; every time I mention a term that is covered in that database clicking on the word will take you to the page with it's definition.
While your battery(s) are charging, take a moment to inspect the helicopter. Make sure nothing looks broken or bent. If your controller has rechargeable batteries (which is a VERY good way to save money) then charge these as well.
Training Gear
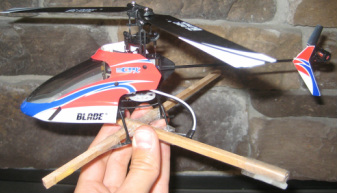 This is actually my training gear before I trimmed it up better. But the idea is the same.
|
|
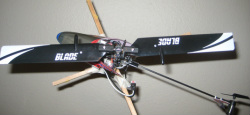
Now it is time to start thinking of training gear. When learning to fly a CP heli for the first time, training gear are ESSENTIAL! This comes from a guy who didn't use training gear on his coax. If you don't use training gear on your CP heli, you will end up scratching your blades big time in lesson 2 and possibly breaking them. That isn't to say you'll be entirely brake proof with training gear, but you will save yourself lots of headache and frustrations and money if you use training gear.
The video to the above right shows hammydude12345 showing how to make very inexpensive durable training gear. Making your own training gear is a great way to cut down on flight costs. For my mCP X (which I learned to fly on) I simply used two pieces of hobby wood, about 1/6" x 1/6", and cut them both about 6" long. Then I cut a 1/6" by 1/6" by 1/12" deep knock in each piece so that I could put them together into an "X" shape, using wood glue and tape to secure the center. Then I mounted this structure with tape resting right on top of the plastic mCP X skids. This is a somewhat bulky way to make training gear (and perhaps not practicable on larger helis), but it worked fine throughout all of flight school.
The video to the above right shows hammydude12345 showing how to make very inexpensive durable training gear. Making your own training gear is a great way to cut down on flight costs. For my mCP X (which I learned to fly on) I simply used two pieces of hobby wood, about 1/6" x 1/6", and cut them both about 6" long. Then I cut a 1/6" by 1/6" by 1/12" deep knock in each piece so that I could put them together into an "X" shape, using wood glue and tape to secure the center. Then I mounted this structure with tape resting right on top of the plastic mCP X skids. This is a somewhat bulky way to make training gear (and perhaps not practicable on larger helis), but it worked fine throughout all of flight school.
Blade Tightness
Before the "Shake Test"
The last thing you need to know before moving onto lesson 2 is how tight to make your blades in their holders. The best way I have heard is by using the "Shake Test." Here it is:
Hold out the helicopter so that the axis of blade rotation is horizontal (see the picture). Then rotate the rotor hub until it is parallel to the ground. Put the blades out so they stretch horizontally as well. The blades should stay outstretched and not drop when you let go of them (as in the picture).
Note to micro fliers: On micro CP helis, you may want to violate this rule and make your blades loose at all times (not so loose they come out, of course!) to help eliminate side effects of your heli's small size.
|
Now shake the helicopter. If your blade tightness is correct, the blades should fall and hang down (like in the picture). For larger rotors (such as 500 size and up) it may be necessary to be a little tighter. You can tell if your blade tightness is too loose because the rotors will lag during spool up (speed up) and lead during slow down. This has the potential to damage the rotors near their connection to the rotor hub. However, if you make the rotors too tight they are more likely to break on impact (i.e., when you crash).
|

After the "Shake Test"
|
Now, it is very difficult to get this exact, but if you are very careful and patient, you will be able to get very close. If you can make your blades correctly or very nearly correctly tightened, then you won't have to re-tighten as often. It is fine, actually a little preferable (when you are learning) to have the blades a little loose. This will make crashes more survivable.
Note: the two pictures above are actual before and after "shake test" pictures. However, every time the blades are moved they get looser, so they didn't stay this way very long. As I mentioned above, this is fine.
Note: the two pictures above are actual before and after "shake test" pictures. However, every time the blades are moved they get looser, so they didn't stay this way very long. As I mentioned above, this is fine.
A Quick Sales Pitch about Computerized Radios:

Computerized Radios are, in my opinion and many others', more important than the helicopter. They allow so much and make learning to fly an rc heli so much more fun than with a non-computerized radio. PLEASE check out my Radio Rampage page, it has a run down of all the reasons why you would want a computerized radio. I cannot stress enough how important it is to get a computerized radio. Hopefully you have one if you are at this point, but if you do not, the second biggest recommendation I can make in all of flight school is to get one!
Okay sales pitch over, on to Lesson 2 . . . the first spool up!
Okay sales pitch over, on to Lesson 2 . . . the first spool up!
