
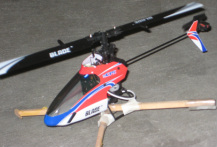
Lesson 4: Hovering Exercises

Lesson 4: Hovering in Motion
Today's lesson is all about expanding your comfort zone while hovering. It will be difficult, but not nearly as much as hovering. You will basically be doing Ground Exercises from lesson 2, but this time in the air. You will also learn how to make throttle / collective corrections to keep the helicopter glued in 3D space.
You'll want to still fly with the same beginner-friendly DR and throttle and pitch curves from lesson 2, as well as in the same type of location. You'll still be bobbing up and down a bit today as you learn to fix this, so you'll want a surface that is smooth, like cement or less preferably asphalt, again. Grass will get your training gear and / or vertical stabilizer caught and possible send the rotors into the ground.
Approximate Lesson Length: About 4 hours of Flight Time
Height Corrections
Now that you can hold your heli over the helipad, it is time to learn how to hold it at the same height. Don't worry; holding it at the same height in and of itself is fairly easy. The difficulty is holding altitude while maintaining position. Your brain is going to learn (with practice) how to do lesson 3 and maintain height.
Standing in position 1, practice hovering tail in at about 6 inches (about 15cm) off the ground, making sure that the height remains as constant as you can. When you feel comfortable with that height, raise your heli 6 inches or so to about a foot (30cm) and practice hovering there, keeping the heli "glued" in that horizontal and vertical position. It will be difficult, but with practice you can do it.
Next raise the heli to 1.5ft (45cm), then 2 ft (60cm), then on up to the limit of ground effect hovering, which is when the helicopter will continue to rise almost indefinitely unless throttle / collective is reduced. This is generally about 2-3 ft (60-90cm) above the ground.
One Dimensional Movement
Now that you can maintain your position and height at 2ft, it is time to start moving around in a controlled way. Start by slowly nudging the cyclic stick forward to get the helicopter moving nice and slowly forward. Like Lesson 2, the goal is to get the helicopter to move straight forward. You should probably realize by now that to accomplish this, you will need to use all directions on your cyclic control.
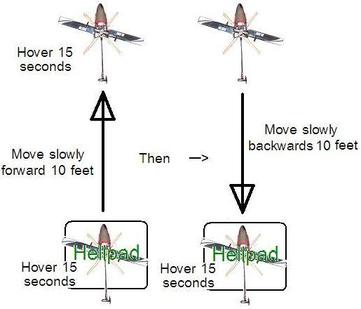
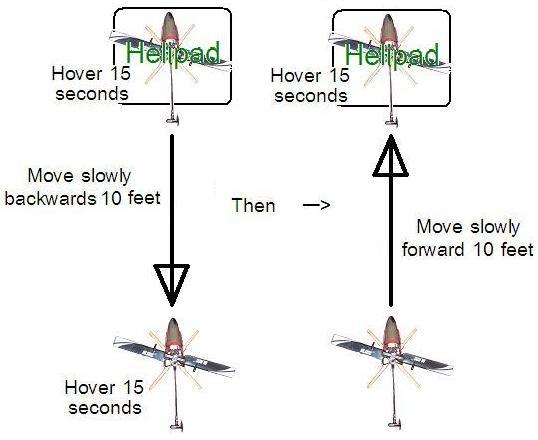
Now stop about 10 feet (~3m) away from your helipad and hold a hover at 2ft up. Then come back to your helipad and hover. This is a forwards hovering exercise. After hovering over your helipad for about 15 seconds, come back 10 more feet (3m) and hold a 2ft hover for another 15 seconds. Then move back to over your helipad. This is a backwards hovering exercise.
Now stop about 10 feet (~3m) away from your helipad and hold a hover at 2ft up. Then come back to your helipad and hover. This is a forwards hovering exercise. After hovering over your helipad for about 15 seconds, come back 10 more feet (3m) and hold a 2ft hover for another 15 seconds. Then move back to over your helipad. This is a backwards hovering exercise.
Forwards Hovering Exercise
|
Backwards Hovering Exercise
|
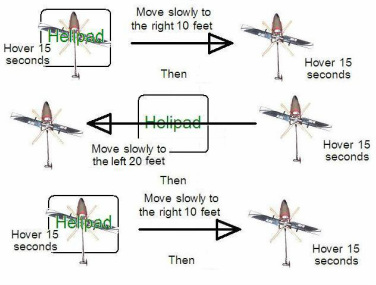
How did you do? If this was very difficult, keep practicing this. If not, then lets move on to work on rolling. Starting at 2ft over your helipad, slowly move about 10 feet to the right and then hover there for 15 seconds. Now come back to the left and hover over your helipad for 15 seconds again. This is a right hovering exercise. Then go 10 feet to the left once more, hover there 15 seconds, and come back 10ft to the right again and hover over your helipad. You guessed it, this is a left hovering exercise.
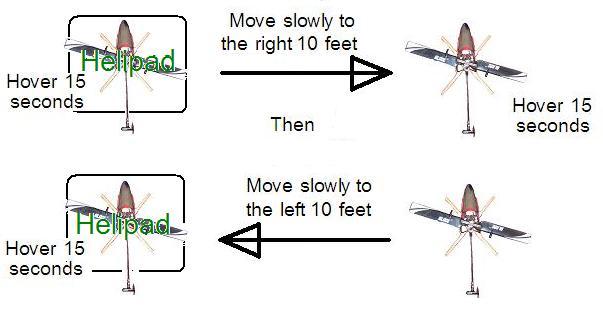
Right Hovering Exercise
|
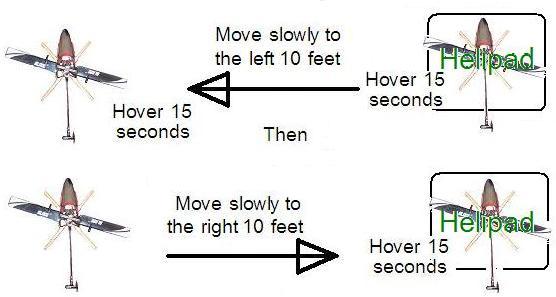
Left Hovering Exercise
|
Now take out the hover over your helipad. Thus, for forwards and backwards hovering exercises, you would start out by moving forward 10 ft from you helipad and hovering, then move 20 ft backwards, passing the helipad, and hover for 15 seconds. Finish the exercise by returning to your helipad and hovering. Do the same for left and right hovering exercises, linking the two together to get one big left/right hovering exercise. (See Below)
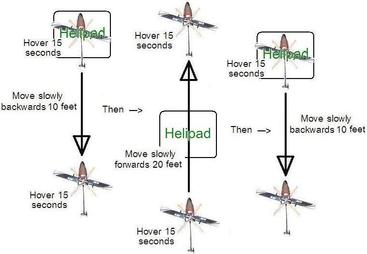
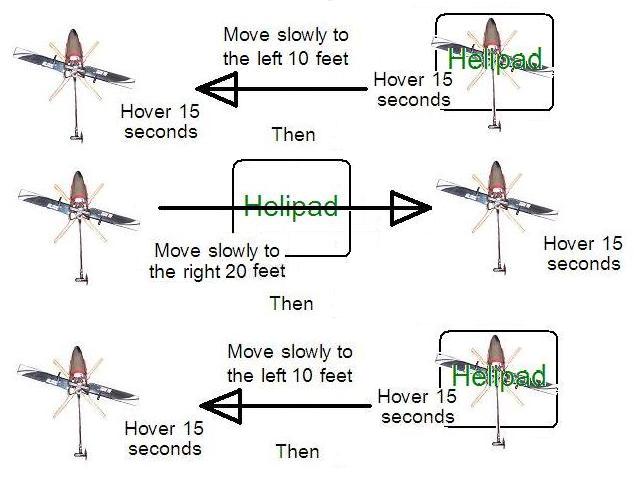
|

|
As soon as you are comfortable with this, begin to practice putting one ground exercise after another. In other words, practice a forwards, then right, then backwards, and then left hovering exercise in succession, all without stopping over your helipad. In effect, you are doing Right Angle hovering exercises. Remember to keep these movements very slow and controlled, if you go faster the helicopter gets more stable and you aren't really learning very much. Don't forget that the purpose of Lesson 4 is to cement hovering.
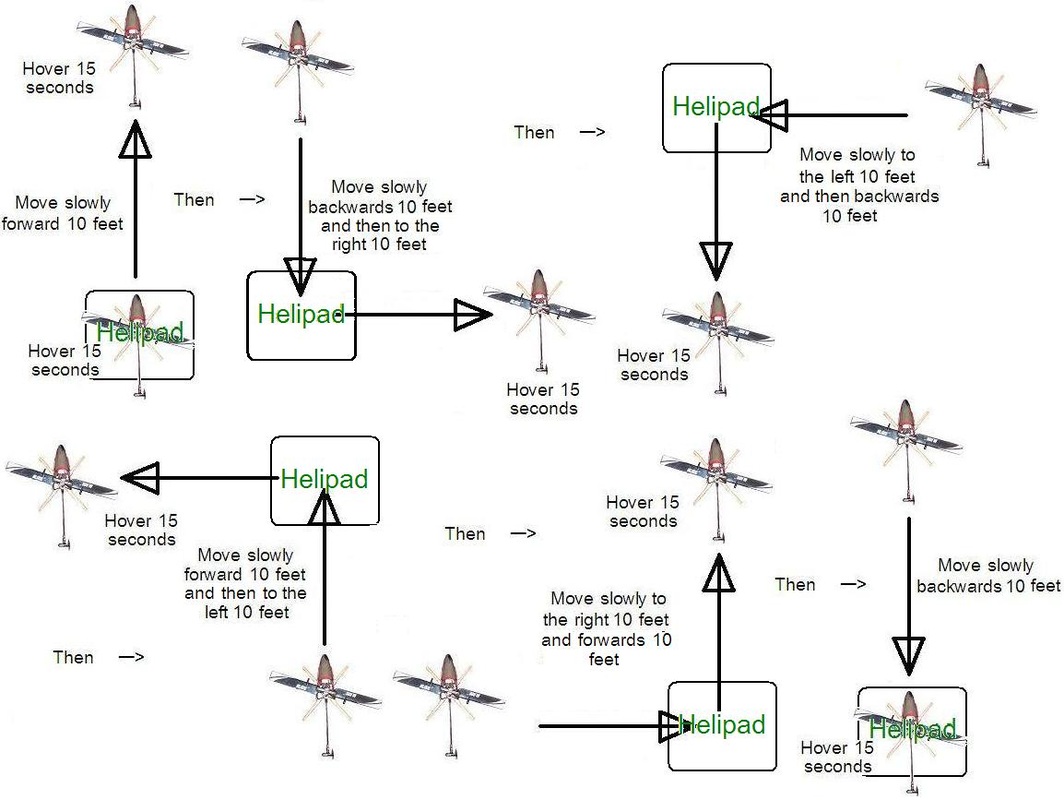
90 Degree Hovering Exercises
2 Dimensional Movement
Now that you can do single-cyclic Hovering Exercises, it is time to start introducing two directions to your hovering exercises. Starting at 2ft above your helipad, move forwards and to the right 10 ft (3m) and hold a hover there about 15 seconds. Now come back to your helipad and hover - this is a Forward-Right Hovering Exercise.
Hopefully by now you can guess what a Backwards-Right, Backwards-Left, and Forwards-Left Hovering Exercise are, but just in case you can't: move 10ft in that direction, hover for 15 seconds, and then come back 10 ft to your helipad and hover 15 seconds.
When you're comfortable with each of these Hovering Exercises separately, connect Forward-Left with Backwards-Right Exercises and Forward-Right with Backwards-Left Hovering Exercises, just like in One Dimensional Movement but slanted. This will produce long Diagonal Hovering Exercises.
When you can do this, Practice 90 Degree Diagonal Hovering Exercises (Forward-Left to Backwards Left Diagonal Exercises with a 90 Degree angle between the two flight paths).
The purpose of all these exercises is to get you 100% comfortable with keeping your helicopter always under control, whether stationary or moving. By now, your precision on your controls is very good. You are becoming an RC Heli pilot! Move on to Lesson 5 to learn how to do Cyclic Figure 8s . . . Lesson 5 is probably the easiest lesson, but you've earned a break with all your dedication so far. Congratulations! You know the basics of how to control an RC Helicopter!
